Example

Monday, January 11, 2010

Neato Table Number Idea

Good morning and happy Monday.

Just saw this neat table number project via DIY Bride and thought I'd pass it along. You can find the full tutorial over at Firefly Bachelor & Bachelorette Parties. I always love a great idea for reusing plastic bags!

Although I'm still not sold on the whole table numbering thang.. There are great arguments on both sides, I really can't decide which way is best for us to do it. It makes a lot of sense just to have a few tables reserved so the grandparents have a good table and you know, the bride & groom have a good table, and then the rest can fend for themselves.. BUT I still like the idea of assigning tables for everyone. GAH decisions...

Being that we're in The Season, any new readers out there newly engaged? I'm coming up on the anniversary of our engagement, very strange how fast the year went by. Last February it seemed like 2010 would never arrive..

Labels: , , ,

Monday, October 19, 2009

Ceremony musings plus: random DIY tip

I'm enjoying this lull in planning right now. I feel like I could get some things done and out of the way but I don't have to, and that's very pleasant. Probably once we get past the holidays I will enter the urgent-oh-crap mode but for now I'm enjoying just focusing on whatever I want, for however long I want.
Random I WANT: Gruyere and Black Pepper Gougeres. Found on Etsy - they're sold out but I just bet you can convo them for a new order. I've been looking for an idea for a "pre-ceremony finger food type thing,"I think this would be perfect.. (source)

Last night Mr. Fairfax and I had a really great little ceremony planning session. We went through the vows and ring exchange wording sent to us by our officiant, changed 'em up a little to our liking, and then went over the other pieces we'd come across that we'd like to work in.. it's very exciting. A couple times we said things out loud just to make sure they sounded ok and a little thrill went through me, like Wow. This is what we're going to say to each other. Weee! It's very exciting. Just need to figure out who we'll ask to read the special pieces we've picked out. Do you have special readings you'll ask friends/family to read during the ceremony? How did you go about choosing the readings/who would read them?

We've also decided we're totally stealing the Jewish wedding tradition of the yichud. I first heard about it on A Practical Wedding and it just seemed so darn perfect, I can't believe all wedding traditions don't include this. It might be the 15 minutes I'm most looking forward to.

This weekend I also set my mom on her projects - hand-painting our aluminum tins we'll use for favors, and designing a hand drawn map that we'll give to the guests in their welcome bags in their hotel rooms (she won't have to hand draw each one, I'll have them printed from her design). It's great having an artist mom! So glad I'm able to include her in these things so I don't have to feel bad for shooting down her veil ideas.. :)

Random tip: if you are doing any DIY paper pieces (program, invites, table signs, etc.), and you have not heard about Impress, go check it out! I heard about it a long time ago but only recently re-discovered it and immediately bought a bunch of stuff. I can't wait till it arrives so I can start stamping and punching every scrap of paper I have lying around..

Labels: , , ,

Thursday, September 24, 2009

DIY Updates and Raves

Wow. I have not posted in a long long time.

First let me thank Miss Glen Echo for suggesting a make-up person after my last post. I did not read your comment until later and actually found someone in the meantime, but I wanted to thank you for the suggestion! I think the makeup artists I chose is going to be good. No makeup artist has gotten my makeup right and she nailed it on the first try.

Anyway the real point of this post is to heave a gigantic sigh of relief and exhale because I have 37 days until my wedding and I have almost everything DIY-related locked down!! I am so happy I can barely stand it. We had a power Sunday last weekend and worked on stuff from 11 a.m. until 8:30 pm. But it is all done. When we decided to "save money" by making everything paper related we had no idea what we were getting into. We ended up making: the invitations, rsvp cards, cd covers for the cd favors, burning 120 cds filled with music we love, programs, menu cards, table numbers stuffed into frames and the escort cards will be done when we get the final headcount. We are also making our centerpiece which is a crystal wedding tree. This sucker is wayyy harder than I thought it would be. I am having a devil of a time finding the "right" crystals. Perhaps I will post a picture in here after I attempt to put it all together this weekend.

I still have to emboss the luminaries I bought, and finish up the Out of Town bags but that is a walk in the park compared to the months of months spent on making all this stuff for the wedding. Mr. NationalHarbor is burnt out but he is hanging with me. He has been be my side cutting ribbon and spraying adhesive every inch of the way.

So that's it. For those still in DIY Hades-- there is light at the end of the tunnel!

Oh- before I forgot. I posted a while back about the exercise program I had just bought and was going to start doing called Insanity. I HIGHLY recommend it. I am not a beachbody coach or anything. I just want folks who are looking for a quick way to lose weight to know this is out there. It's a 60 day program and I just finished Month 1. I am eating normally- no starvation diets for me-- but the inches have come pouring off. 40 minutes a day and in one month this program has helped me wear jeans I have not worn in over 2 years. I squeezed into a pair of jeans I bought too small over 4 years ago and have never worn and I know by the end of Month 2 I will be able to wear those suckers. One of my bridesmaids is getting married next weekend and I am wearing my fave little black dress that has been collecting dust since 2007. This program is not for everyone because it is a killer- but if you need help shedding inches to get into your wedding dress-- try this!

Labels: , ,

Wednesday, September 23, 2009

cool DIY idea

I was just hanging out over at Design*Sponge and can I just say where the heck have I been? I've seen the site referenced before but never really took a look at it - so many awesome projects! I know they appeal to the better-at-thinking-about-doing-it-than-doing-it side of my personality but honestly there are at least a few projects in there that I might. actually. do.

Like this one, from photojojo. uh! talk about a perfect solution to the how-to-display-baby-pics-without-putting-together-a-slide-show dilemma..


I'm in love with this site. Just wanted to share! :)

Labels: ,

Thursday, September 10, 2009

A Paper Party!

We are still dragging our feet weighing our options about a reception venue, but I'm leaning towards one. It would give me a chance to do some decorating - not that I have the time and talent for that sort of thing. I do love these ideas, from Martha of course!

{both images: Martha Stewart Weddings Pop-Up Party Decorations}

OK maybe I am DIY-talented enough to hang up paper garlands! The price is completely do-able too at $26 for 24 garlands, each one 12 feet long. That's a lot of garland for the price!

I'm also determined to at least try my hand at these pretty paper flowers. I like the idea of using them as escort cards - place them in vases inside the door with a little tag on each stem that has the name and table number. All these ideas are making me appreciate that my wedding is in March - I can spend the winter in my warm house in front of the TV with some DIY experiments!

Labels: ,

Wednesday, August 26, 2009

the veil

So I've finally got my hands on some french netting, and so farrrrr - birdcage veils are a lot more difficult than they look. It's kind of fun playing around with it but at the same time incredibly frustrating because I haven't yet been able to get it to do what I've been picturing in my head. Here are a couple pictures of my efforts.. just haven't quite got the hang of making it behave how I want. But, I've got several months to get it right so I'm not too worried yet.


Here's another piece I was playing with, thought I'd try working in these fabric flowers, they weave easily into the comb (one is weaved in already, looks promising). I'm thinking some of those little blue roses with some pearl and crystal accents? maybe a couple Feathers for good measure? we'll see.
For you DIYers, do you find it's hard to find Space for your projects? Mr. Fairfax and I are in a one-bedroom apartment and my "workshop" is basically the dining room, I've just taken over a wall and started stacking things. It's not easy to work up the motivation to go drag everything out to play with it, especially when I realize all the crazy ideas floating around in my head are well, crazy, and I don't have half the materials I'd need to accomplish everything I want to. Anyway here's a glimpse of my sad corner (sorry it's off kilter; on the left it looks like maybe the recycle bin but no! it's my growing collection of glass jars we'll be cleaning up and using as vases for the tables).

Labels: , ,

Monday, August 24, 2009

DIY Madness

I have been trying to get a lot of things done now while I have the time. We are reaching the 6 month mark (OMG!!!) and I do not want to be stressed with tackling projects towards the end. Come February, I want to concentrate on making sure everyone gets paid, not on assembling the programs.

I initially started working on this memorial candle project some time ago, but stopped when I did not like them. I finally went back and finished them a few days ago. We nixed the unity candle ceremony for our wedding and decided to switch it up a bit by doing a memory candle lighting. Basically, my cousin and his cousin will walk down the aisle and light the candles at the beginning of the ceremony. The candles will stay lit throughout the ceremony to represent our loved ones' spirit being with us as we join hands in wedding matrimony.

This was my inspiration for my candles.

(Sorry, I saved this image some time ago. Please comment if this is your image and I will credit you appropriately.)

I decided to use clear labels for the pictures in the hopes that they will be illuminated from the inside and appear a bit more "glowy." I am not sure now how that is going to work and I refuse to buy a candle just to check it out...so this will be a game day experiment. On the grand scheme of things, this is not a huge priority of mine considering that many folks won't even see the candles from where they are going to be sitting...I just wanted the candles made and marked off my list.

This is how they turned out.


I also did our table numbers. Technically I don't know how many tables I will have just yet, but I figured I will need at the very least 20. I got some picture frames from Wal-Mart, (against my normal political and personal objections with the store...this wedding has caused me to do many things I would not normally do for the sake of saving a dollar) added the table numbers and titles via Photoshop and then printed out the images on my home printer.

We originally wanted to use old Blue Note jazz covers as our table numbers, but they did not really go with our new vision for the wedding. I am a bit sad, however, that I cannot place people at the "Billy Holiday" table.

A recent visit to the National American History Museum gave me another idea that was just as awesome. The Scurlock Studio has an exhibit there based on the photography of the Scurlock family of affluent blacks from the early 1900s through the 60s-70s. I loved the idea of having really gorgeous, happy, vintage images as our table numbers, plus, it was totally an easy project. Mr. Glen Echo, however, is nervous about our potential unauthorized usage...but I cannot image anyone would mind.

This is how they turned out.


Have you guys been working on any projects lately?

Labels: ,

Monday, August 17, 2009

DIY Thank You Notes

I've been a DIY queen. Well, a procrastinating queen but a DIY queen no less. I have half a dozen projects that need to get done in about 26 days and I'm starting to go a wee bit crazy.

But last night, I banged one project out right quick - some thank you notes! My shower was over a month ago and I've been procrastinating on the Thank You's but I finally created the thank you's last night.

What did I use? Some Folded cards from Paper Source, a "merci" stamp and a blue ink pad both from paper source as well. The whole project took about fifteen minutes. The end result?


and a close up....


They look kind of "plain" but I really like the simplicity of them. I saw a similar style at Paper Source but they didn't have them in navy blue so I decided to do them myself. Now I just need to find the time to actually...write them. Along with making favors, menus, programs, escort cards, and table numbers. *sigh* It will all get done...it has to.

Did you do anything special for your thank you notes???

Labels: , , ,

Sunday, August 09, 2009

Make Up Solution

Per a friend's recommendation on Twitter, I ixnayed the idea of using Sephora to do my own make up. I couldn't justify spending almost $300 on make up alone.

So yesterday, per her recommendation, and the recommendation of a couple of other friends, I trekked down to Woodbridge to try out Ulta. Now, it wasn't that I had to go that far, they have a location in Downtown Silver Spring, but we were heading down to Ikea and Michaels anyhow, and made an afternoon of it.

After 30 minutes I was sold. Ulta, as a store has pretty much everything that has to do with make up, hair care, body care, you name it. Not to mention, they have a salon in there! I didn't check out the salon, however it might be worth my while in the future.

The person I spoke with, immediately after I mentioned bridal make up recommended me to this product:
The 7 in 7 kit - a $155 value for $55!!! She demo'ed it for me, it was light, easy, and comes with SEVEN full size products. It also comes in a few different shades for different skin tones! I bought the foundation and powder (that doesn't come with it) so all in all, with a couple brushes that I didn't have, I spent $130.

But! Ulta has an amazing rewards program that gives you 4 points for ever $1 you spend - and you get amazing rewards at various levels. I signed up for it and could already get $4 off my next purchase or I can wait till I spend more.

While I might not exactly live so conveniently to an Ulta, it's definitely worth going out of my way for.

Labels: , ,

Thursday, July 23, 2009

Hear Ye! Hear Ye!

The word is out! We sent our save the dates!

Much, much earlier than they are supposed to be...

The plan was intricate to say the least. It was a staggered process. We have approximately 80% of our guests coming from out of town. 80% of that 80% are coming from Virginia (all over Virginia) and are my family. The plan was to send out their save the dates in October, since they have less out of town plans to make than Mr. Glen Echo's family, who are all basically coming from Atlanta. The first round was supposed to go out August 1.

But, we have been engaged for 10 months now...

We will be engaged for a total of 18 months...

I wanted to send our save the dates...

So, they went out and I am happy. We have 8 months left and I could not wait any longer (have I ever mentioned I am totally impatient). I now have no idea why we were waiting to send them out (I think it was one of Mr. Glen Echo's ideas).

So, here they are, my cute little save the dates. I made four different versions, using different pictures of us as kids that sort of matched in age.

(Disclaimer...I am NOT a photographer and I have not mastered the craft of taking "blog" friendly pictures of my crafts...I promise the next time I post an image of something that I have made, I will set it up and make it look nice...no coupons in the background next time...)

My mother hates this version...she says my legs look too long. I love this picture of me and Santa...she is crazy!

I totally over thought the idea for the magnets. I felt that the actual card with the wedding info was too big to "force" people to put on their refrigerators, so I did not make them magnets. I really wanted to send magnetic save the dates though... So, I got adhesive magnets and made an insert. I figured people could put them up or not...but at least they had the option.

I used different sheets of scrapbook paper (mainly because I could not pick just one) and cut them in half. I then folded the sheet long ways to create sort of an inner envelope for the save the date card. I stuck the save the date card inside and then closed it with a round adhesive sticker. I then put them in velum envelopes with a colorful address label. We ordered a custom stamp with our names and addresses from Sweet Paperie via etsy.

Mr. Glen Echo was much better at stamping the envelopes than I was. This is his handy work. My man is so crafty!


Mr. Glen Echo showing those magnets who's the boss!


We love Save the Dates!

Labels: , ,

Thursday, July 09, 2009

Signed, Sealed, Delivered

So I made my invitations. Start to finish. Every inch of them? My work. I used other invites as inspiration but...the work? Mine.

I designed them in word and printed them first. There were 3 layers all pasted together - the navy A9 back, the slightly smaller middle layer and the A2 scalloped edge white paper with the actual wording on them. Let me tell you - all that gluing? Not fun.


Next, we lined the envelopes with green polka dot paper. I addressed the invites - I'm still not AS pleased with the "calligraphy" but I didn't have the time to get it professionally done nor did I have the money so it is what it is.


I had the hardest time figuring out the wording for the RSVP cards - given that we need to know how many people are ordering what, there was a bunch of debate on whether just saying "chicken" and "fish" was appropriate. We opted, finally, for "chicken" or "striped bass" guiding them to our website for details on the menu (which I suppose I should put up since the invitations are in the mail!)

The final product?


So today, I trekked over to Arlington to mail them out - you see, we have a beef with the DC Postal Service. The Friday before Father's Day, Fiance sent out his father's day card to his dad from the Post Office at 4:55pm. He gave it to them because we were out stamps. Paid the 44 cents and was on his way.

His father still has not received the card.

A week or two later, we sent his mother her mothers day card (yes, a month and a half belated), I dropped it in a mailbox near our apartment on my way to the gym one day, and last weekend when we were in Connecticut, she informed us that she had indeed received the card.

!!!!

Additionally - FMIL has told us that an anonymous person has sent us a wedding card. However, the wedding card in question was sent a week and a half ago and still has not yet been received. Sooo...DC Mail? You're on notice.


I digress, we have a groomsman in Japan so yesterday after getting my hair did, I popped into Longworth HOB to the post office there. Had them weigh it, bought the stamps (all 85 of them) and then sent his with the appropriate postage - all $1.82 of it.

Last night as we were stamping the envelopes, I found that 5 of my stamps were MIA (they have since been found) and so I was going to buy 5 more. But they didn't have my stamps (which are super cute by the way!). The man, bless his heart, suggested lovely wedding rings stamps with....goats. Goats?!?! Seriously?!?!

Ladies, I was about to have a bridal freakout all over the Eads Street Station Post Office. No lie.

Alas, I decided to hang onto the envelopes and decided that I'd find the stamps. They had to be at home. But then, the guy tries to tell me that my envelopes - which are all stamped with 61 cent lovely wedding cake stamps - cost 81 cents. I told him, no, no. Clearly he was mistaken. They weighed them yesterday and I was told by the USPS in Longworth that they were 61 cents.

Bless his heart (again) because he believed me and let it go. Let's just hope and pray they don't all get sent back to me because lawd there will be hell. to. pay.

After all that, my invitations are sent out. Before our July 12 deadline. Tomorrow? We head up to Connecticut for my bridal shower...expect a full report on Monday!

Did you have any snafu's with your invitations? Did you DIY or buy them?

Labels: , ,

Save the Dates

The “Save the Dates” were my first DIY project for the wedding and also my first inkling that I was going to be admittedly difficult, picky, and perfectionist-y about wedding details. I knew I wanted a post card; I knew I wanted our pictures on it, and I loved this mini – envelope idea from Martha Stewart :

A friend had done wedding thank you cards with the bride holding a large white foam board that said “Thank” and the groom’s said “You!”, which I thought was adorable – so another idea was born. I made the signs using letters printed in a super large font and cut and glued onto the foam board. And finally, we wanted to introduce the Outer Banks into it - so we had my mom take pictures of us holding the signs at various spots on the grounds of our venue. Transferred the picture into Zazzle (super easy and great to design postcards in), and viola, the front of the Save the Date postcard complete. We were standing in the exact spot where we will get married!


Next up - designing the back of the card. I used this site to make sure that all the postal requirements on size, border, depth, postage area, and postal markings were met. I did all of this design with Zazzle as well, picking a font, making a cute little calendar icon in PowerPoint, putting return address (those nice people in the postal service returned un-deliverable cards to me, which is not typically done for post cards). And after a round of proofs, where I tweaked placement, my post cards arrived and were BEAUTIFUL!!

Now for the little Martha inspired envelope. This is where I have the most regrets, though I LOVED how it turned out, it took SO MUCH TIME and many mistakes. I couldn't find a premade envelope that fit my size (2 x 2.7) specifications. So okay – I’ll make an envelope, no problem. I created a template, and then cut each envelope from sheets of scrapbook paper, assembled and glued each, then glued to the postcard. I was very worried about the envelope getting ripped off the postcard in the mailing process, so I used a super strong adhesive roller thing. Making the inserts for the envelope also (are you surprised) was a process – I had to cut each insert out, glue it to the colored paper backer and tie together. I had good help for that part from my future Maid of Honor (I was auditioning her for the part – she passed with flying colors). Put the inserts into the envelope, glue envelope flap with a special temporary glue (again Martha product), stamp (with a full, not postcard, stamp), and done. Final product looked like this:


Top picture is the back (with the nice post office persons writing "please forward") - you can see the bar code on the bottom, the red hand cancel on the top, and faint grey on the top as well.

Bottom picture is the inserts in the envelope with our venue, date, and website info.

Insanely, I did not create any extras to keep, I was just focused on getting the required number FINISHED and then never looking at them again. The picture above is one that was mailed and got returned as a bad address, so you can see how they look after surviving the postal process. Everyone LOVED them, and they all arrived intact. (Though you can see in the picture that my finger doesn’t have a ring on it!! :))

Labels: ,

Monday, July 06, 2009

challenges of DIY

I'm starting to think all my DIY aspirations are a bit too optimistic! I have so many ideas rolling around in my head and I really want to make Everything myself, but this past long weekend I sat down and tried my hand at creating some of the pieces I was imagining and.. it's just not that easy! I think I'm going to rely even more on Etsy than I originally planned - as well as my mom. She is actually quite a seamstress, and she really wants to help. For some reason I'm having a really hard time delegating - is this an issue for any of you?
Here's my list of things I'd like to make:
- programs
- birdcage veil and fascinator
- shrug/bolero (I'm thinking satin or silk shantung, since my dress is all lace. I've never sewn anything like this in my life, not sure what's possessing me to think I should make this myself)
- button bouquets (more details later)
- a bunch of other tiny little details??
I still think I can handle the programs and some of the other little detail items, but after playing around with buttons the past few months, I'm losing a little steam. Using flowers would just be easier! But my sister is all excited about the button thing, she's making my cake and plans to incorporate little candy buttons as part of the cake decorations - I think she's a genius and it's going to look awesome. Here's a pic of her first attempt at making the candy buttons (she got a mold for these here). Photo source: personal.
Hmm I want to gush about my cake for a sec. She made a test cake for us and it was amazingly delicious - white cake with poppy seeds, with lemon curd and fresh strawberries for filling. And then european buttercream frosting (it's lighter and less sweet than other common buttercreams). I have pics of it somewhere, I'll have to share! I'm very excited about my cake. Mostly because Mr. Fairfax was blown away by it and he's not really big on sweets, so I was very pleased we came up with a cake he could really get behind.
Oh and the favors. My sister also had the brilliant idea to give away candy buttons as favors, and I found some sweet tins for cheap at Save-On-Crafts.com that I could buy and my mom has volunteered to hand paint each one.
So I'm feeling kind of committed to the button thing - which is awesome because I still love love vintage buttons and the whole idea is great. I'm just having doubts about my motivation to create hundreds of button flowers. They're really not as easy as they might look! Especially since each flower is basically a stack of 5 - 7 buttons and creating just-right color combos is a bit of a challenge. How does this lady make it look so easy?!

Labels: , , , ,

Tuesday, June 30, 2009

D.I.-Why?

Most brides these days are incorporating handmade, personally crafted elements into their wedding for a more intimate and down-home feel.

I, on the other hand, am cheap...

I decided a while back when I first started planning my wedding that I was going to DIY
a few things here and there in order to save some money. This idea has turned into quite a laundry list of projects (24 to be exact).

So I figured I needed to find a way to avoid the inevitable stress that DIY projects bring...Yes, that's right...STRESS...I said it! Some wedding blogs would have y
ou to believe that DIY is ssooo much fun! They take you step by step through the process as they do it, you envision some lovely girl with an apron on and a copy of Everyday Living sitting next to her as she meticulously and perfectly glues, cuts, folds and sprinkles crafty goodness into her special day...I begin to day dream and see myself as an urban Martha Stewart, gluing, cutting, folding and sprinkling pieces of crafty magic everywhere...but in actuality, I end up with a scene similar to this... (source)

My plan is to tackle one project at a time. I know that sounds so simple, but for someone like me, it is easier said than done. I have a list that I am working from (it of course has no order) and I decided to just go down the list, find inspiration or instructions on what I want to do and how I want it to look and then, as Nike says, "Just Do It!" With 8.5 months to go, I should be able to get all 24 items done...right?

First on the list was my "Will you be my Bridesmaid?" cards. Those were simple...I did something sort of like what Miss Woodley Park did...I got some photo cards from Target, cut out some pictures of bridesmaid dresses, cut out some heads from pictures I had of my girls and voila! Cards...so simple and easy...I must be a DIY genius! A DIY idiot savant, if you will! Here is how they turned out... (personal photos)

So cute!

Ok, I am good with the cards...so I made our Save the Dates (which I will share at a later time) and again thought I was a crafting maniac!

So in my DIY frenzy, I tried to do our wedding invitations...all 165 of them. One... Hundred... Sixty... Five... Invitations! I eventually decided my sanity was more important than saving a few hundred dollars. But, not before I created 60 of these little disasters.

I did not, however, let this insignificant, although time consuming, blunder deter me. I might have fell, but I got back on the ice and decided to go down my DIY list and do our rehearsal dinner invitations. All I needed to make was 28, not 165 invitations, it was a much simpler project to attack an
d it did not need as much planning and forethought. One tip Ladies, pick and chose the DIY projects you tackle carefully...if you don't, you might end up wasting much more time and money than you would have if you had just paid a professional (I spent a total of $300 on materials on those ugly invitations...oh...that actually hurt to write!)

I downloaded an invitation template I found here and added th
e perfect Mexican themed font to it from here. I personalized the template with our rehearsal dinner info via Photoshop and downloaded a simple, yet perfect wrap around label template from here. The paper and envelopes were purchased from Michael's (total of approximately $25) and I printed them out at home. This is the result, check it out. (personal photos)
There are plenty more projects to come. What kind of projects are you ladies working on? Any blunders so far?

Labels: ,

Tuesday, March 31, 2009

I Return... This Time More Crafty!

I do not have the prowess that my Maid of Honor (Miss Gallery Place) has, when it comes to the Do-It-Yourself projects. Seriously, she posted her about her Save the Dates, and I was so impressed at how great they looked when we received ours in the mail.

I have not been around for awhile, because we have hit that bit of a lull where the venue has been booked, as well as our photographer, DJ, etc. I've decided to take this time, however, and start looking into the small details. Favors, decor, etc. I feel like I'm about to become a squirrel, stock-piling nuts for the winter.

Going back to my original point, I am not crafty, but I think I'm about to take a leap into the big world of DIY.

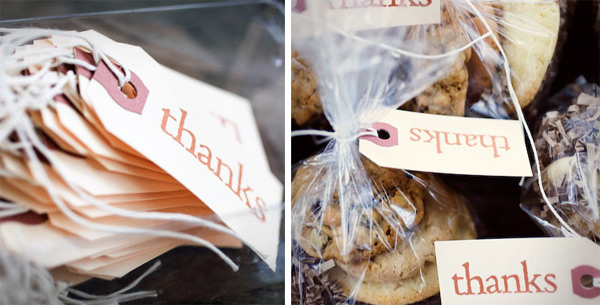
As many brides with internet connections do, I peruse Weddingbee.com. It was there I fell in love with Mrs. Cherry Pie's favors!


Source

For those of you unaware, Mr. JeffMemorial and I no longer live up to my DC Nearlyweds moniker. Due to having to switch our date and venue, we are now having a beautiful mid to late fall wedding (this November 7th!) in Old Town. Our colors are red, brown, and ivory/white. We're looking for romantic, rustic, and fall going into winter. It's something that suits both of us. We wanted laid back and low maintenance, but we wanted a welcome nicely-decorated vibe, as well. As a side note, it's nice that Mr. JeffM is actually interested in this stuff, and enjoys giving input. A lot of the design and choices have been from his ideas!

Those tags would fit PERFECTLY! I must have them! Sadly this means... I must MAKE them! Per Mrs. Cherry Pie's instructions, they are super easy to make. I buy the tags. I buy the stamp and ink. I stamp the tags. I put rustic-y rope to attach to goodie bag. The end.

But there's that fear of... will they look good enough? It's a bit nerve-wracking, to say the least.

I can't be the only one with DIY fears, heh.

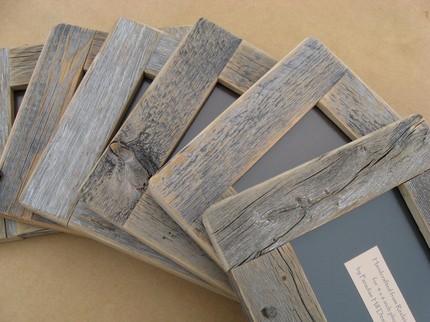
In addition, I also found these FABULOUS picture frames, which I must find a use for:


Source

They're $21 a piece, so my idea of awesome framed table numbers goes out the window, but it might be nice to have a beautiful photo of us put in the frame... perhaps set it on our card/guestbook table? It's a thought.

While I'm not a little details person at all (I couldn't care less about a shade of red, and I don't do personalized matchbooks!), these two things really jumped out and got me excited about planning again. I haven't been too into it recently.

Labels: , ,

Wednesday, February 25, 2009

Tutorial on Mason Jar Lanterns

I found this great tutorial over on a backyard wedding on how to make those pretty mason jar lanterns you see everywhere in wedding world. Anyhoo--backyard wedding has some nice close-up shots of the process and detailed instructions.


I plan to put two of these lanterns together for our wedding, so I was delighted to find this. Funny how craft projects like this are so much easier to do when you can find tips and instructions. I won't be setting them up as lanterns though, I plan to fill them with flowers and hang them on shepherds hooks to denote our "altar" space for the ceremony, a la Miss Cherry Pie at Wedding Bee.

Mrs. & Mr. Cherry Pie got married outdoors in a lawn type area, we'll be getting married in a similar space. The lawn at the Hendry House does have a large metal arch covered in vines and wisteria, but there is another space that is a little larger (it'll fit more chairs and a larger "aisle"), but nothing really demarcates the head of the aisle. I think even having just two tiny jars of flowers will help orient people and give it a more familiar look, if that makes sense.

Speaking of guidance and instructions, I've never been a big one for asking for help, but I'm really trying to learn! So far I've scored big by just throwing out open requests for help to friends. No kidding, one day I posted on my gchat "Does anyone secretly play acoustic guitar or perform with a string quartet?" and within an hour I had several leads, and within a week, I had my acoustic guitarist at a very reasonable price.

I've also started leaning on my wonderful future mother-in-law more. She's offered to help many times, but I'm the type who hates to impose--I know, I know, if someone offers you're not really imposing!! She's a wonderfully talented weaver and has many friends who also work in fiber arts. I asked if anyone she knows makes linen handkerchiefs as I would love one for our wedding. She brought out a whole collection of heirloom linens, some handcrafted by her mother and let me pick one. Now I have a beautiful, handmade lace handkerchief with my new last initial embroidered in pale blue to carry down the aisle. I also mentioned I was on the hunt for Mason jars and she lent me her whole stash of old canning jars!

I think sometimes, especially as the bride, it's feels difficult to walk the fine line between asking for help/including people and being perceived as demanding things from other people around you simply because "I'm the bride that's why!"

Has anyone else struggled with this a bit?

Labels: , , ,

Tuesday, January 27, 2009

DIY Invitations

All of my tireless research and labor (FI helped, too. Lol!) have resulted in these gorgeous invitations! . . . . Ta-da!


We are so happy with how our DIY invitations came out. The pocketfolds, backing layer, and printed layer are Envelopments products, which we purchased from EnvelopMe.com. Envelopments has very high quality papers, and although I researched several retailers, EnvelopMe had the best prices for the products we wanted, including our 4 x 9 pocketfold, which was not easy to find. The invitation envelope, RSVP card paper, backing layer and envelope are all from Paper Source. A new one opened in Annapolis, not far from Annapolis Mall. I designed the shape and text of the printed layer and RSVP card in PrintShop.

I learned how to assemble the invite by watching a tutorial video on the Paper Source website, and I figured 'I can do that!' FI and I have been hard at work for weeks, but we are both pretty pleased with the results, and I have discovered that my soon-to-be-husband is fairly crafty. Bonus! At first, we thought that by assembling our own invitations, we'd save money, but once we purchased all of the elements and supplies to make them, it pretty much equalled the cost of having them custom made. However, we don't regret making them ourselves, because we got exactly what we wanted. We had a project that allowed us to spend alot of quality time, and we're quite pleased with our work.


A few of key points:
  1. If you ever consider tackling a DIY project for your wedding, give it a shot, as long as you have the time to dedicate to it. You'll probably be very pleased with the results.
  2. Letterpress and thermographic printing are gorgeous, but home printing can be just as beautiful as long as you're printing on quality invitation materials.

  3. Before ordering invitation materials, be sure to request samples, which are almost always free, just to make sure the colors and weights are exactly what you want them to be.

Happy Planning!

Labels: , , ,